
If you love miniature crafts, tiny crochet projects, and handmade decorations, this Dollhouse Crochet Pattern is such a fun project to make. I personally had a wonderful time creating this little dollhouse. What I enjoyed most was watching it slowly change from a few small crochet pieces into a tiny house with floors, walls, a roof, decorations, and even a little bunny living inside.
This isn’t the kind of crochet project where you finish a few rows and you’re done. There are lots of tiny details to enjoy, and that is exactly what made this Dollhouse Crochet Pattern so special for me. Every little part adds something to the final result.
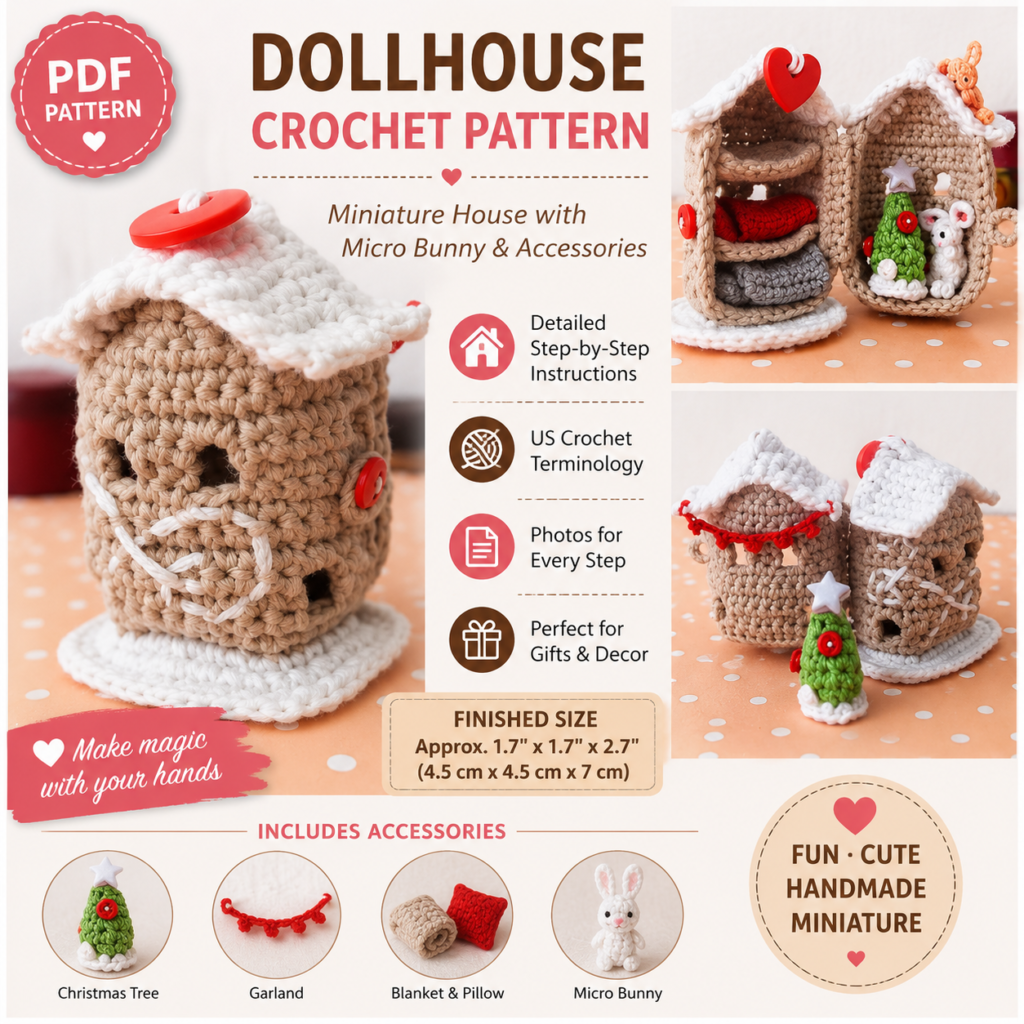
The finished Elendan dollhouse is approximately 1.7 × 1.7 × 2.7 inches (4.5 × 4.5 × 7 cm). The pattern uses US crochet terminology.
What Makes This Crochet Pattern Special?
What makes this Dollhouse Crochet Pattern different from a typical crochet project is the miniature construction. You aren’t simply making one flat piece. The house is built from individual floor and wall sections, followed by an attic and roof. A wire frame is then added to help the tiny structure keep its shape.
And then comes my favorite part: the tiny home décor.
The pattern includes a little garland, Christmas tree, blanket, pillow, and an adorable micro bunny.
It really feels like you’re creating a miniature world rather than just making another crochet item.
Materials Needed for This Crochet Pattern
For the dollhouse itself, you’ll need:
- Yarn A: Beige, 100% cotton, approximately 30 g
- Yarn B: White, 100% cotton, approximately 20 g
- Yarn weight around Fine/DK
- 1.75 mm crochet hook
- Scissors
- Yarn needle
- Button
- Approximately 40 cm floral wire/tape
- Tape measure or ruler
- Round-nose pliers
The original pattern recommends crocheting tightly because the house needs to be solid and straight. You can also use thicker yarn and an appropriately sized hook if you’d like to make a larger dollhouse.
Crochet Pattern Abbreviations
This pattern uses US crochet terminology:
- ch – chain
- sl st – slip stitch
- sc – single crochet
- hdc – half double crochet
- dc – double crochet
- inc – increase
- dec – decrease
One important terminology note: US single crochet is equivalent to UK double crochet, while US double crochet is equivalent to UK treble crochet.
How to Make the Dollhouse Crochet Pattern
Step 1: Crochet the Dollhouse Floor
The first part of the Dollhouse Crochet Pattern starts with three floor details using beige yarn.
For each floor detail, begin with a foundation chain of 9 stitches. Work single crochet into the second chain from the hook and continue across for 8 stitches. Rows 2–4 are worked with chain 1, turn, and single crochet across. A trim is then added around the edges to create the finished floor shape.
At this stage, the pieces may look very small and simple. Don’t worry—that is exactly how a miniature project begins.
Step 2: Build the Crochet Dollhouse Walls
After turning the floor detail, the walls are worked directly from the floor using the back loops.
The wall construction is divided into several sections. Some sections use chain spaces to create openings, while others are worked as solid rows of single crochet. These openings and sections eventually become part of the tiny architectural details of the house.
As you continue through the rows, the little house begins to become recognizable. This was one of the most enjoyable moments for me because I could finally see the shape developing.
Step 3: Add the Second Floor
The next section continues the wall construction and joins another floor detail. The pattern works the walls and floor together through their back loops, creating a connected miniature structure.
Don’t fasten off at the end of this section because the attic is worked from this point.
Step 4: Shape the Crochet Pattern Attic
The attic is created by gradually decreasing the number of stitches.
The first attic row begins with slip stitches followed by 8 single crochet stitches. The following rows use decreases to reduce the section from 8 stitches to 6, then 4, then 2, and finally 1 stitch.
This simple shaping makes such a difference. Suddenly, the little structure starts looking like a real miniature house.
Step 5: Crochet the Dollhouse Roof
The roof is made with white yarn. One thing I particularly like about this Dollhouse Crochet Pattern is the way the roof is joined to the walls and attic while you crochet.
The pattern explains that you can crochet the roof directly to the house instead of sewing a separate roof on afterward. If you prefer, you can also make the roof as a separate piece and sew it into place.
The roof is built through repeated rows of single crochet, attaching sections to the attic as you go.
Step 6: Add the Wire Frame
The wire frame helps give the tiny dollhouse stability.
The pattern measures the house border and uses approximately 19.5 cm of wire for the first part. The wire ends are joined with round-nose pliers, and crochet stitches are then worked over the frame.
The second part uses a frame of approximately 17.5 cm, with a buttonhole loop added for an approximately 8 mm button.
If you’ve never crocheted over a wire frame before, take your time with this section. The tiny scale makes careful handling much easier.
Step 7: Finish the Dollhouse
Once the frame is covered, weave in the yarn ends and hide the wire joining point with a needle and yarn. You can also sew on the decorative button and add embroidery if you want to personalize your house.
The ground section is then worked with white yarn around the front loops of the floor detail. It finishes with a combination of single crochet, half double crochet, double crochet, and a slip stitch.
And that’s when the first part of the tiny house is finally ready.
Miniature Accessories for This Crochet Pattern
The fun doesn’t stop when the house is finished. This Dollhouse Crochet Pattern also includes several miniature accessories.
Crochet Garland
The tiny garland uses a 1.00 mm hook and thin yarn. It is created from chains and slip stitches and can be attached to the roof or another location you prefer.
Mini Christmas Tree
The little Christmas tree is made with green yarn and a 1.75 mm hook. It is worked in spiral rows with decreases to create the narrow tree shape. White yarn is then worked along the foundation chain to add another decorative detail.
Tiny Blanket and Pillow
The miniature blanket is made with a 1.75 mm hook and begins with a chain of 9 stitches. After five additional rows, you have a small rectangle measuring 6 rows by 8 stitches.
The pillow is even smaller, beginning with a chain of 5 stitches and creating a rectangle measuring 6 rows by 4 stitches.
Micro Bunny Crochet Pattern
Honestly, the micro bunny may be the cutest part of the whole project.
It uses a tiny 1.0 mm hook and fine yarn around 650 m per 100 g. The bunny begins with 6 single crochet stitches in a magic ring and is worked in spiral rows. Tiny arms, legs, a tail, eyes, and ears are added to complete the little character.
The ears are worked directly into the head using chains and double crochet rather than being made separately and sewn on. That is such a clever technique for something this tiny.
How I Felt While Making This Crochet Pattern
I genuinely enjoyed making this Dollhouse Crochet Pattern because every stage gave me something new to look forward to.
At first, I was working with tiny floor and wall pieces, and it was difficult to imagine how they would eventually become a house. Then the walls started connecting, the attic took shape, and the roof completely changed the look of the project.
But adding the miniature accessories was probably my favorite part. The little tree, blanket, pillow, garland, and especially the tiny bunny gave the dollhouse its own personality.
That is what I love about miniature crochet. You spend time working with very small stitches, but the final result feels much bigger because there is so much character packed into such a tiny piece.
Crochet Pattern Tips for the Best Results
Because this is a miniature project, stitch tension is especially important. Keep your crochet fairly tight so the house stays solid and straight, as recommended in the original pattern.
I also recommend:
- Keep your stitch counts consistent.
- Use a small, sharp hook that feels comfortable in your hand.
- Take your time when working the tiny openings.
- Measure the wire carefully before joining the ends.
- Hide yarn tails as you go whenever possible.
- Use the photos in the PDF alongside the written instructions for the construction details.
- Don’t rush the miniature bunny—the tiny scale requires patience.
Get the Complete Dollhouse Crochet Pattern PDF
If you would like to make the complete dollhouse, including the detailed construction and miniature accessories, you can get the full PDF Dollhouse Crochet Pattern from my shop.
Final Thoughts on This Crochet Pattern
This Dollhouse Crochet Pattern is one of those projects that makes you appreciate just how much can be created with a tiny hook and some yarn.
From the first floor detail to the finished roof, wire frame, decorations, and little bunny, every stage adds another piece to the miniature story. I personally found the process incredibly enjoyable, especially when the separate pieces finally started looking like a real little home.
If you love miniature crochet patterns, detailed handmade decorations, or projects that let you slow down and enjoy every stitch, this dollhouse is a lovely project to add to your collection. The complete pattern includes the house and its miniature accessories, so you can create the entire tiny scene yourself.